Showing posts with label crafts. Show all posts

Tuesday, March 27, 2012

DIY Headboard


I had been planning on making a headboard for our master bedroom for about a year and finally got around to doing it. Thanks to my mother-in-laws step by step how to, it was actually pretty easy.
I started with a huge piece of plywood.
Drew half of the shape I wanted on a huge piece of paper.
Folded paper in half.
Cut my desired shape out of paper.
Traced the shape onto my plywood.
My husband sawed the shape for me.
I tightly stapled two layers of batting (found at Hobby Lobby) to the plywood.
I super tightly stapled my fabric (found at fabric.com-7 oz duck) to the plywood.
Hammered my nailhead trim kit (found at Beacon Fabric) around the headboard twice.
My husband and I love it so much! We are planning on hanging a sweet rhino head like this one over the headboard.

I also made the grey/white pillows with fabric from fabric.com.

You can see the dresser I refinished and the sunburst mirror I made hangs above it. My sister-in-law made me that awesome grey/white striped blanket at the bottom of the bed. It is even prettier in person.

Here is some art I made near the bottom of the bed, hanging next to another window. The typography canvas idea was totally stolen from someone else. I made it before pinterest so for the life of me, I cannot remember who I got that idea from. Anyone know so I can credit them?
Is anyone else working on their master bedroom? What projects are you working on?

Linked to:


Visit thecsiproject.com

Friday, March 16, 2012

Pinterest Challenge: Ombre Dresser

So thankful for pinterest. Almost all of my projects have been pinterest inspired, but I thought I would share one of my most recent. This ombre dresser has been floating around Pinterest in all of its awesomeness. After my mother-in-law donated her old dresser to me, it was on like donkey kong.
I had initially planned on spray painting each drawer a different shade of gray, but after going to Lowes and seeing that was a crazy idea, I grabbed a bucket of white, a small bottle of black, and some new paint brushes. I then mixed the perfect shades of grey into bowls.
I needed more storage for all my junk in my craft room. And since my craft room is actually the room that our front door leads into, I wanted it look more like a room and less like a junk yard.
I think it worked out:
I need to rub some soap around the drawers so they pull a little more smooth. Hence why they look slightly crazy below. I love it anyway. I pop my head into this room just to look at my new dresser. It makes me happy.
See the challengers here:

Sunday, August 21, 2011

Telephone Chair


My mother-in-law hooked me up with this awesome telephone chair. I love it. Like really, really love it. The lines and design are so chic. The fabric was in great condition, but I wasn't totally loving the wood stain. It was beautiful, just not my style. So, one day I just decided to spray paint it.I covered the upholstery with plastic bags and painters tape and then dragged it outside. My initial plan was to sand the shiny finish off, but after sanding the same spot for about 10 minutes and not making a bit of difference, I decided to test just spraying the drawer without sanding. To my surprise, it looked and stuck great so I continued spraying the rest of the chair.
At first, I thought just the silver looked kind of cool, but after a couple days it started reminding me of tin foil. I found exactly what I wanted to do here and decided to add an antiquing glaze.
The antiquing glaze really gave it a finished look and now I don't think I would ever guess it was spray painted. I plan on adding a little more glaze and adding some big flowers to that "vase", but was too excited about how it has turned out so far so I had to share! I'll post more pictures once it is all totally completed.

Tuesday, March 29, 2011

Happy Boy Spot.

I was just working on a lampshade for the master bedroom, but my hot glue gun blew up in my face. It was wild (and scary...very scary). I have no idea why it happened, but now I can't finish until I get a new hot glue gun.
So, I thought I would catch you up on a few other projects I have been working on all in one post. I am pretty behind on all the things I want to share because my husband has been out of town and I have been spending my time trying to find a new apartment instead of blogging.
I tell ya, I finally start loving our town home and then my husband gets a new job...in a different state...after only one year of living here. I'm hoping we will be at our next place long enough to really make it feel like a home. For now, this is what we've got. Just remember, we are renters. No paint or pretty home details. Just outdated, boring walls.
Welcome to my son's room. He is 3 and loves cars. :)
He loves to tell us what the lights means at every stop light so I made him the words in the coordinating colors so he can relate the words to their meanings. I used my Cricut and vinyl.
I have moved the art and pictures all over his room and I finally love it all together.
My son and I made the 'C' together. He painted it blue and then that night I made the yellow road stripes with a small stencil I made and hot glued cars he no longer played with on.
I got the idea for the license plate art at [kreyv]. Instead of using fabric and wood, I used a canvas I had picked up at Michaels on sale (2 for $4.99) and painted it with a mix of beige and white acrylic paints (also on sale, $0.29 each). I spray painted the plates and then just used gorilla glue to glue them on. Not as fancy as the original, but I still like it and my son loves it!

The little night stand was inherited from my parents. I had painted it black before my son was born, but I didn't like the black with the brown and blues anymore. Plus, the black had taken a beating. Each chip was very obvious. I painted it white and got a new pretty silver knob. I love it now.
My sister-in-law, Tracy, who also occasionally writes on this blog made him the gorgeous blanket on his bed. The colors are so perfect for his room.
I made the pennant banner by just cutting out triangles with some scrap fabric I had and sewing them together on a piece of ribbon. My son refers to them as his "racing flags."

The dresser was given to us my mother-in-law who had received it from one of her friends. When we got it, it was a bad yellow and very used. I originally painted it black for my son's nursery and then painted it white recently to make his room feel more calming (in hopes it would calm my child...didn't work). I made the numbers with my Cricut and vinyl. I think they may be my most favorite thing in the room.
I also made this mobile using my Cricut. I cut out paper circles and train shapes and then just glued them on a piece of thread and tied them on a painted embroidery ring. I love the way it lightly blows with the fan on.
My sweet boy kissing his baby sister. My mother-in-law made that bag chair. We are all obsessed with it.

Sunday, March 20, 2011

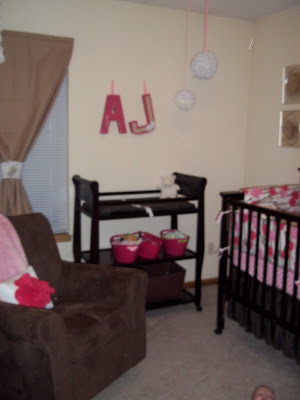
Baby's Room Complete (for now)

If you have been wondering where most of my projects have been going in my home, it is the baby's room. I think her nursery is finished. It is the only girly room in our home and it is REALLY girly. Lots of pink! :)
Try to remember we are renters so there is only so much I can so with those nasty blinds, gross colored walls, and dated brown baseboards. It is what it is. Still, I love her room. It makes me happy being in there. I hope it will make my baby happy, too.I'm still crazy in love with my rose petal "chandelier."
Spray paint makes a big difference. Here are some old gold frames I had from college. I spray painted them white to bring them into 2011.
Much better.
I also spray painted the pink frames. The angel is a painting my b.f.f made for me while we were in high school. It has been with me ever since. The picture of my baby is on her blessing day so the white frame is extra appropriate. I saw the 'You Are Beautiful Just The Way You Are' printable on another blog, but now I can't find it. Does anyone know where it came from? I would love to give them credit. I didn't print it, I made it with my Cricut and vinyl, copying the printable design.
My baby stares at the rosette balls while I nurse her. Notice her little head in the corner? I bit creepy (and adorable), right?
Letters I spray painted and decorated with a butterfly shape using my Cricut, diamond stickers, scrap booking paper, and tissue paper roses.
I love the tulips. I found this bedding at Target for only $16! Bargain!
Do you see the hair clip holder in the corner? My mother in law made it. It is awesome and now I am able to see what clips I have. By the way...most of her hair clips came from Orange5. They are beyond lovely.

Sunday, March 13, 2011

Drop Cloth Pillows

I have been seeing a lot of people use painting drop cloths to make some pretty awesome things. For about $6, I made two pillows and still have enough to make probably 2 or 3 more. Sweet deal.
I painted this pillow with a chevron stencil I found at Tatertots & Jello.

I ruffled strips of fabric for this. Very time consuming, but very cute.

Would you use drop cloth in your home for something other than painting?

Thursday, March 3, 2011

Sunburst Mirror Tutorial

Isn't this sunburst mirror so pretty? I am in love with it. I have wanted to own it for a long time. The only problem is that I can think of about 100 other things I should spend $160 on. Yeah, that's right. The mirror above is $160. I'm not saying it wouldn't be worth it, I am just saying there is no way I could afford it. So...I attempted to make my own. On a much larger scale just because I could.
Sunburst Mirror:
Mirror with flat edges
Bundle of sticks
Hot glue
Silver spray paint
Scissors

Total: About $8 ($12 if you count the spray paint)
I found my mirror with flat edges at Bed Bath & Beyond for $4. I have heard people using a mirror candle holder at craft stores for about $3 so whatever you can find with a flat surface will work. I found the bundle of sticks at a dollar store for $3.
Step 1: Divide your mirror into 6 parts. You may want to use tape or mark it in some way.
Step 2: Cut your sticks to desired lengths. I used six different lengths.
Step 3: Lay out your pattern around your mirror.
Step 4: Once you are satisfied with your design, use just a dot of hot glue to glue the sticks to the mirror.
P.S: After I glued my sticks on, I thought some of the longer ones looked pretty crazy so I trimmed them down.
Step 5: Cover your mirror with painter's tape and lightly spray paint. I put my mirror on a box so I could paint the back of the sticks, too.
(I know I need to clean the mirror. Yikes!)
It definitely is not close to being perfect, but it wasn't $160 so I really like it. I haven't found a permanent home for it yet. I can't decide if I want it in our bedroom or if I want to leave it downstairs. I'm thinking I might have to make more with different styles. Then, I can have them all over my house :)
What do you think?

Here are a few other Sunburst Tutorials that I checked out for inspiration:

Wednesday, March 2, 2011

Rosette Ball (no twist)

Remember these hanging rosette balls I made for my daughter's nursery?
They are so pretty. A lot of my friends have been saying they wish they had a girl so they could have somewhere to display them.
Well...I made another ball for my family room that just sits on our tv stand, no hanging.
I used the same tutorial that I used for my hanging balls, except I didn't twist while rolling the roses. I just loosely rolled them. I think this makes the ball look a little less feminine. Now you can have a ball for anywhere in your home!

Which roses do you like better? Can you even tell the difference in the pictures? I promise they are wayyy different.

Tuesday, March 1, 2011

DIY Curtain Holders

I have been focusing so much on the kid's rooms and our family room that our master has started to look way left behind. I decided the very first thing our (mine and my husband) room needed was natural light. Once a room has adequate light, I feel more inspired to create. To add light, I made curtain holders for our dark, sun-blocking curtains (my husband works night shifts and sleeps during the day so these are necessary).
These were pretty easy and best of all, they were free. I just used scrap fabric and spare buttons.
While it is probably pretty basic for most/all sewers, this was my first button hole. It took serious sewing machine manual time to figure it out, but I did it and I think they look great.
I just cut out 2 white rectangles (I have 2 curtains/windows), hemmed each side, made a button hole on one end and hand sewed a button on the other because I couldn't figure out how to do it on my machine.
I cut strips of fabric left over from my table runner and rolled them into rosettes, using the same technique I used it this video tutorial. I then hot glued the rosettes to the holders.
I love them! What do you think?